- Private car and driver in Delhi / India
- +91-8447445445
- info@discoverindiabycar.com sugar.ankit@yahoo.com
 +91-9818434712
- Follow us:

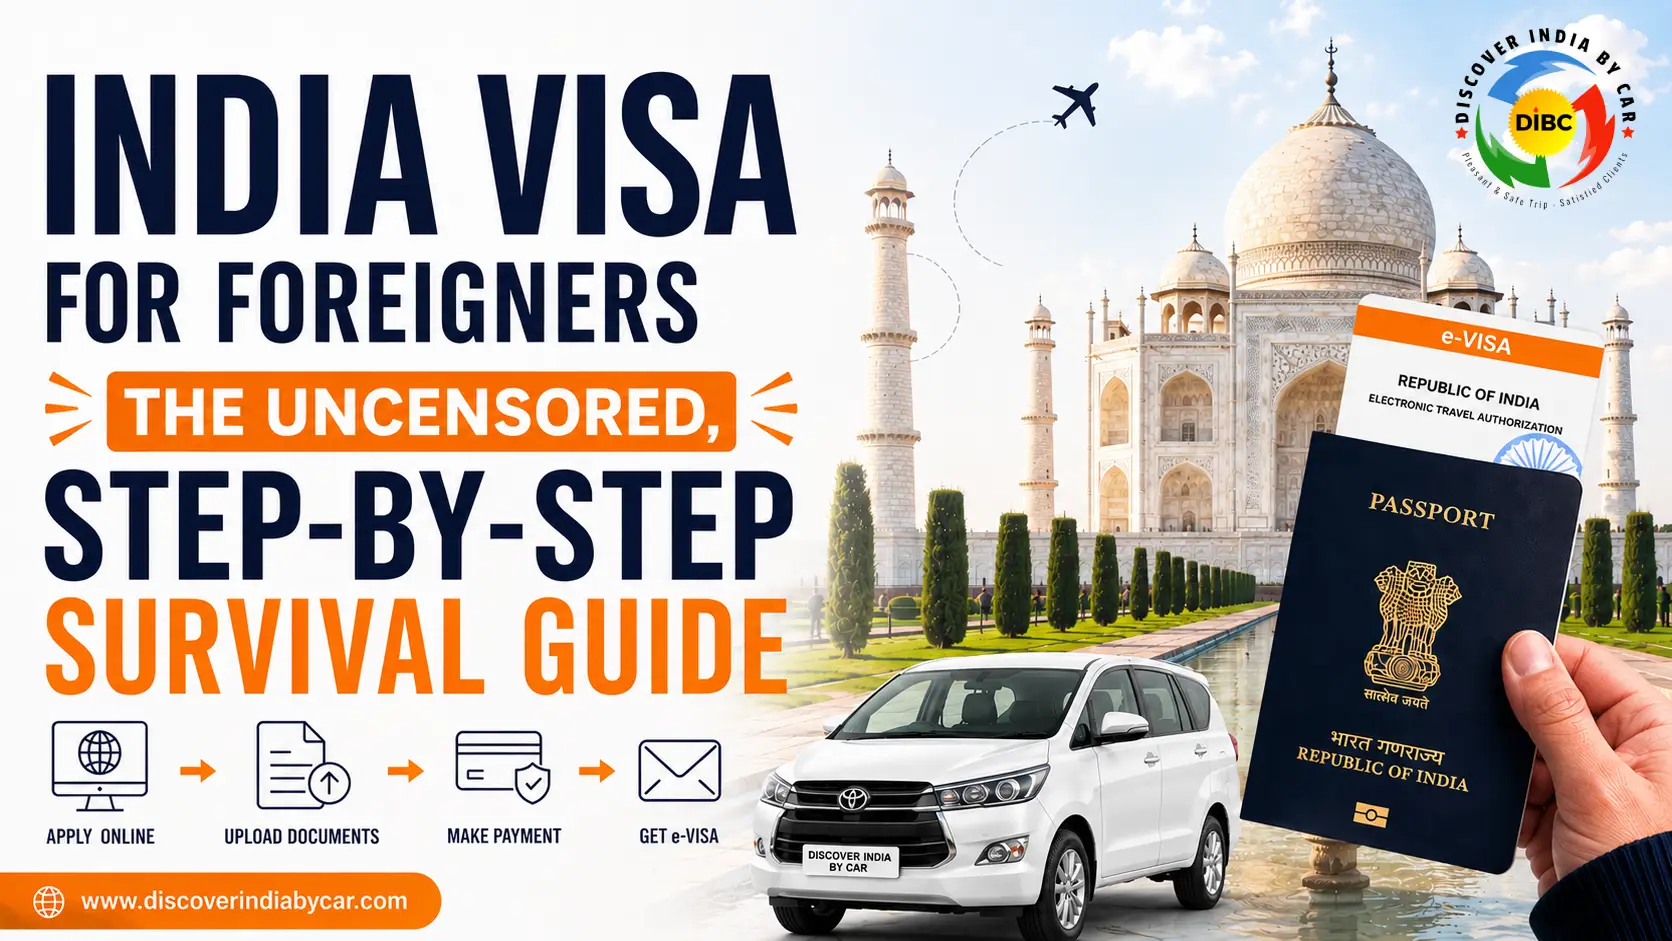
India Visa for Foreigners 2026: Apply Step-by-Step
✍️ Written by Ankit Sugar | North India Travel Expert & Founder, Discover India By Car
Having helped thousands of foreign travellers navigate the chaotic maze of Indian bureaucracy — from dealing with squashed passport photos to surviving blocked payment gateways — I created this ground-reality guide to save you from the most common visa application blunders. I haven’t just researched the government’s e-Visa rules; I deal with the real-world fallout every single day. From rescuing panicked tourists stuck at foreign airports to successfully clearing the red tape for their ultimate Golden Triangle road trip, everything in this guide is born from my own lived experience solving paperwork nightmares for travellers just like you.
India Visa for Foreigners 2026: The Uncensored, Step-by-Step Survival Guide
Listen. I need to be brutally honest with you right from the start.
India is arguably the most incredible, sensory-overloading, life-changing place you will ever visit. I’ve spent my entire life here. I’ve spent the last fourteen years helping foreigners from all over the globe experience it. But the process of actually getting permission to enter this country? It is enough to make a grown adult want to throw their laptop out of a closed window.
You’ve probably already tried. You opened the official government portal. You saw a webpage that looks like it was designed during the dial-up internet era, plastered with terrifying red warning text about automatic rejections and non-refundable fees. You tried to upload a photo of your passport, the site told you the file was too big, and then the whole page crashed, deleting the last twenty minutes of your typing.
I know this happens, because my phone rings every single day with frantic travelers on the other end of the line. Just last Tuesday, I had a guy from Manchester call me in an absolute panic because he spelled his middle name wrong on the application, paid the fee, and realized the airline might not let him board his flight to Delhi. (Spoiler alert: they won’t).
Before anyone asks me to book them a private driver for the Golden Triangle, before we even talk about seeing the Taj Mahal at sunrise or navigating the chaos of Old Delhi, we have to deal with the visa. It is the great filter of Indian travel.
So, forget the generic travel blogs that just copy-paste the government guidelines. I’m going to walk you through this exactly as I would if you were sitting across my desk. We are going to bypass the glitches, beat the automated rejection software, and get your visa sorted so you can actually start getting excited about your trip.
The Big Myth We Need to Kill Immediately: Visa on Arrival
I don’t know who started this rumor on the internet, but it refuses to die. I see it on forums all the time: ‘Don’t worry about the paperwork, just get a Visa on Arrival when you land in Mumbai.’
Do not do this. I beg you.
Technically, yes, India has a Visa on Arrival program. Functionally? It does not exist for you. Unless you are holding a passport from Japan, South Korea, or the United Arab Emirates, you are completely ineligible. That’s the entire list. Three countries.
If you show up at Heathrow, JFK, or Sydney airport with an American, British, Australian, or European passport and tell the check-in desk you’re planning to just figure the visa out when you land… they will physically block you from getting on the airplane. Airlines are hit with massive financial penalties by the Indian government if they bring a passenger into the country without prior authorization. They simply won’t risk it.
You need a visa before you leave for the airport. Period.

The 3 Types of Visas (And Why You Only Care About One)
The very first hurdle is choosing the right category. The Indian government offers a dizzying array of visa types—student, medical, journalist, employment. As a tourist, you have three potential paths. Let’s eliminate two of them right now.
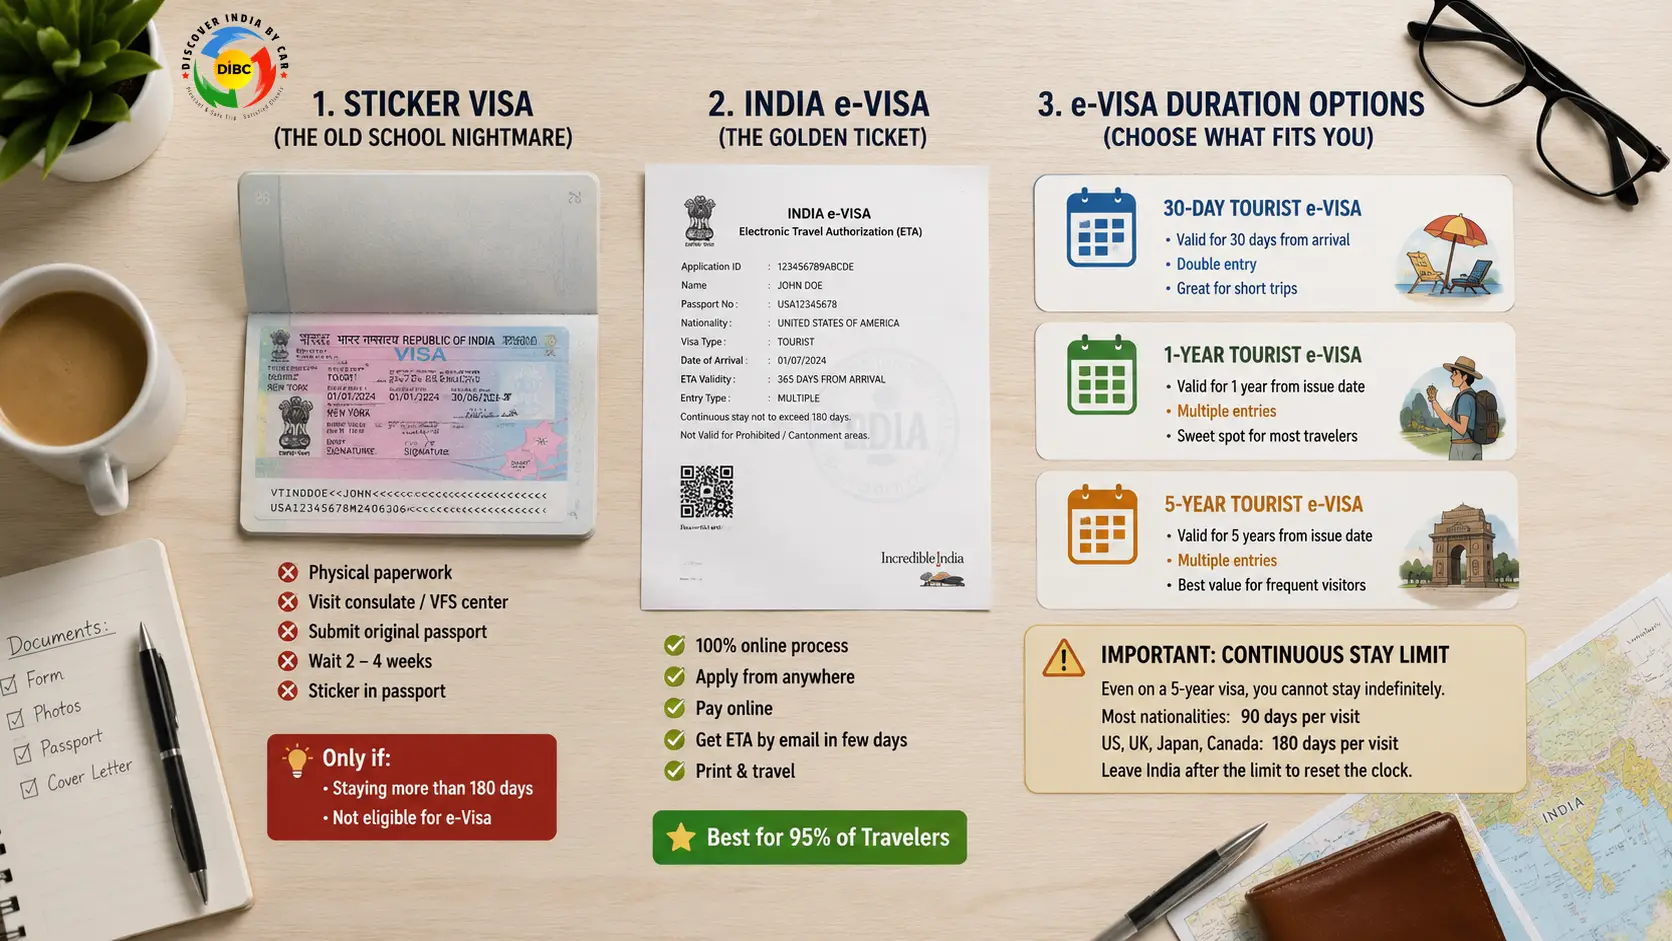
The Sticker Visa (The Old School Nightmare)
This is the traditional paper visa. You fill out an endless physical form, gather physical passport photos, drive to an Indian consulate or a VFS Global processing center, hand over your actual passport, and wait anywhere from two to four weeks. Eventually, you get your passport back in the mail with a shiny, colorful sticker glued to one of the pages.
Why would anyone subject themselves to this? You only need a sticker visa if you are planning to stay inside India for more than 180 continuous days without leaving. Or, if your country is not on the e-Visa approved list (this mostly affects citizens of Pakistan, China, and a handful of other nations). If neither of those apply to you, forget this option exists. It’s a waste of your time.
The India e-Visa (The Golden Ticket)
This is it. This is what 95 percent of international travelers need. If you have a passport from the UK, the US, Canada, Australia, New Zealand, or practically anywhere in the EU, you are eligible for the e-Visa.
It is entirely digital. You apply from your sofa. You pay with a credit card. A few days later, an email arrives with an attached PDF document called an Electronic Travel Authorization (ETA). You print that piece of paper, put it inside your passport, and you are ready to fly.
Within the e-Visa system, you have to choose your duration. And this is where a little bit of strategy comes in.
- The 30-Day Tourist e-Visa: Good for a quick holiday. It allows double entry. Meaning you could land in Delhi, spend two weeks traveling, fly down to Sri Lanka for a beach weekend, and fly back into India to catch your flight home, all on the same visa.
- The 1-Year Tourist e-Visa: This is the sweet spot. It allows multiple entries over a full twelve months. Even if you are only planning a three-week trip, if there is even a tiny fraction of a chance you might come back to India next year for a friend’s wedding or a yoga retreat, just get this one. It saves you from having to battle the government website a second time.
- The 5-Year Tourist e-Visa: Fantastic value on paper. Multiple entries for half a decade. But honestly? Unless you have family ties to India or you travel here for business constantly, it’s overkill.
LISTEN UP: Whichever duration you choose, understand that there is a ‘continuous stay’ limit. Even on a 5-year visa, you cannot just move to Goa and live on the beach. Most nationalities are capped at 90 days per visit. US, UK, Japanese, and Canadian citizens get 180 days per visit. Once you hit that limit, you must leave the country—even if it’s just a cheap flight to Kathmandu for the weekend—to reset the clock.
The Application Disaster Class: Surviving the Portal
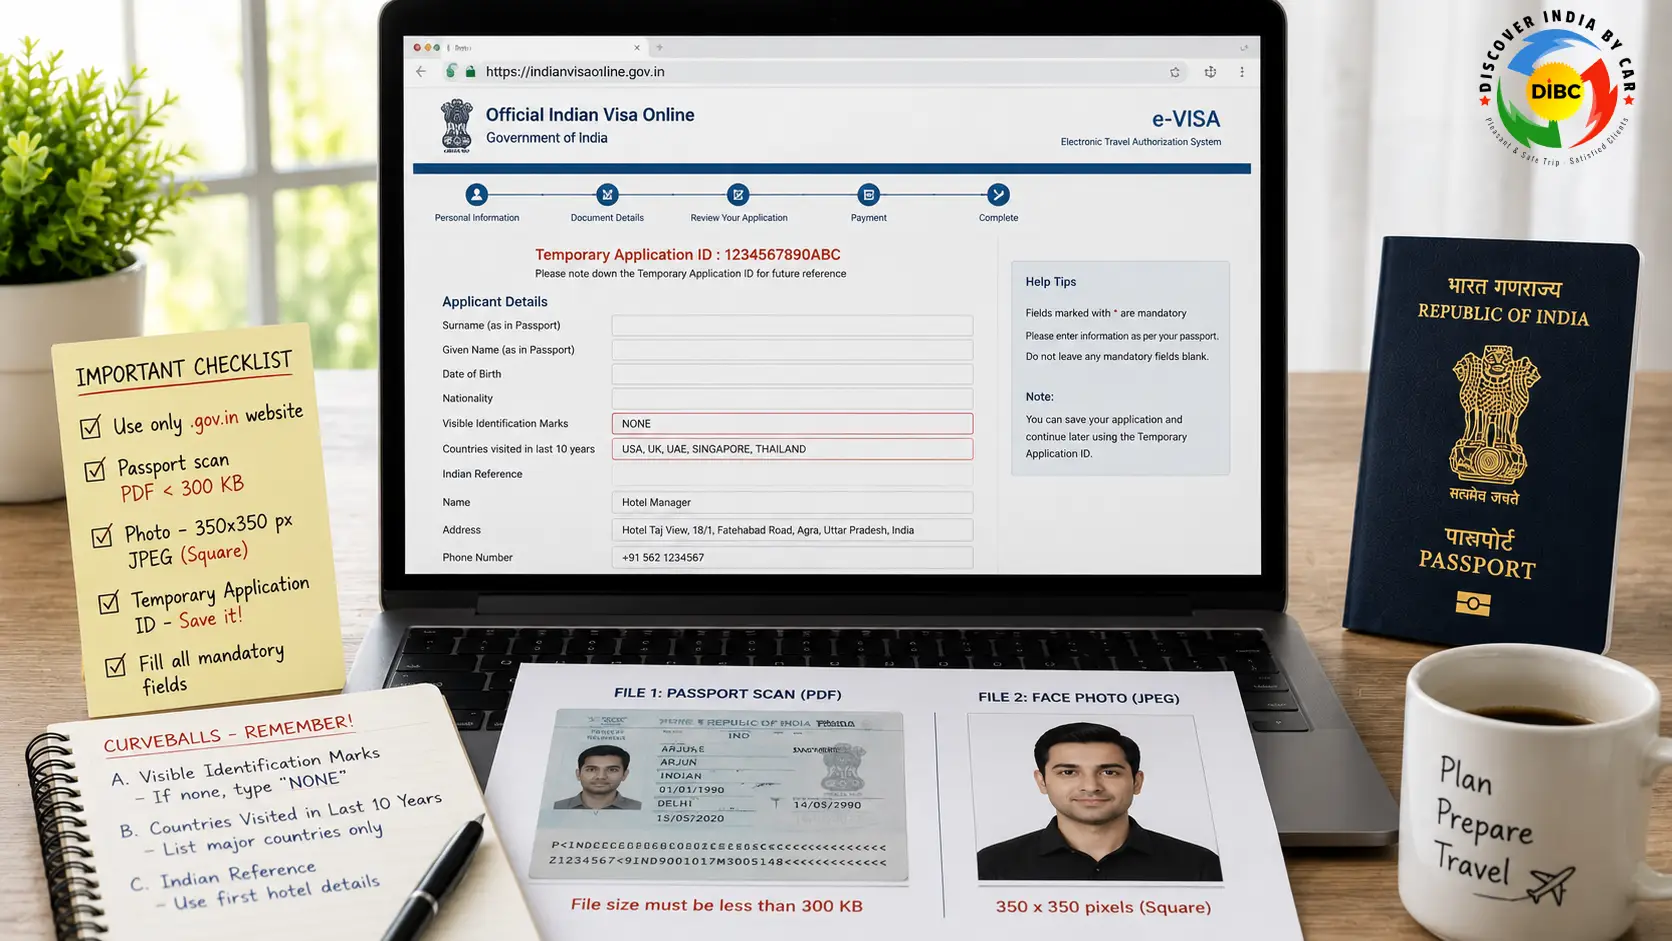
Okay, deep breath. You are going to ‘indianvisaonline.gov.in‘. Be incredibly cautious here. Do a quick double-check of your browser’s address bar. There are dozens of incredibly convincing fake websites that pay Google to show up at the top of your search results. They will process your visa, but they will hit your credit card with massive, hidden ‘service fees’. Only use the site ending in ‘.gov.in’.
Step 1: The File Formatting Trap (Do This First)
Do not click ‘Apply’ yet. If you try to fill out the form and then realize you need to dig up a photo, the site will time out on you and delete everything. I have watched people cry over this. You need exactly two digital files saved directly to your computer desktop before you begin.
File One: The Passport Scan.
You need a color scan of the bio page of your passport—the page with your photo, your date of birth, and that long string of machine-readable characters at the bottom. It must be a PDF format. And here is the kicker: the file size cannot exceed 300 KB.
Modern smartphones take photos that are 4 or 5 Megabytes. If you try to upload that, the Indian government’s servers will basically have a panic attack and kick you out. You have to run your PDF through an online compressor tool. Squeeze the file size down, but—and this is crucial—open the compressed file and look at it. Can you clearly read your passport number? If the compression made it blurry, the human reviewer in Delhi will instantly reject your application. It must be small, but it must be sharp.
File Two: The Face Photo.
You need a digital photo of your face against a plain white background. No glasses. No smiling. Standard passport rules. It must be a JPEG. But here is the single biggest reason people get rejected and lose their application fee: the photo must be a perfect square.
I cannot stress this enough. If you upload a standard, rectangular portrait photo from your iPhone, the portal’s software will forcibly squash and stretch your face horizontally to make it fit into their square box. When the immigration officer reviews your file, they will see a distorted, wide-faced alien instead of you. They hit ‘Reject’. The fee is gone. You start over.
Use a basic photo editing tool on your computer. Crop the image to exactly 350 by 350 pixels. Make it a square. This one step will save you so much grief.
Step 2: Navigating the Form
You click apply. The very first thing the site does is generate a ‘Temporary Application ID’ in red text at the top of the screen. Grab a pen. Write it down right now. When—not if, but when—the portal crashes on page three, that ID is your lifeline to log back in without retyping your life history.
The form asks standard bureaucratic questions. Your parents’ names, your religion, your educational background. But then it throws a few curveballs.
Curveball A: ‘Visible Identification Marks’
People stare at this question for ten minutes. If you have a prominent scar on your cheek, or a massive tattoo on your forearm, type it in. ‘Scar on left cheek’. If you have absolutely nothing visible, do not leave the box blank. Type the word ‘NONE’ in all capital letters. The software hates blank boxes.
Curveball B: ‘Countries Visited in Last 10 Years’
If you are a backpacker who has been to thirty countries, do not panic. You do not need to pull out your old passports and list every single border crossing. They just want a general idea, and they are specifically looking for high-risk nations. List the last five or six major countries you visited, separate them with commas, and move on. Don’t overthink it.
Curveball C: The ‘Indian Reference’
This is the moment where solo travelers totally freeze up. The form demands the name, address, and phone number of an ‘Indian Reference’.
‘Ankit,’ they ask me, ‘I’m just going to Agra to see the Taj Mahal, I don’t know anyone in India! What do I do?’
Relax. The immigration department knows you are a tourist. All you have to do is open the booking confirmation for the very first hotel or hostel you are staying at. In the name box, type ‘Hotel Manager’ or just the name of the hotel. Put their address. Put their front desk phone number. Done. That completely satisfies the requirement.
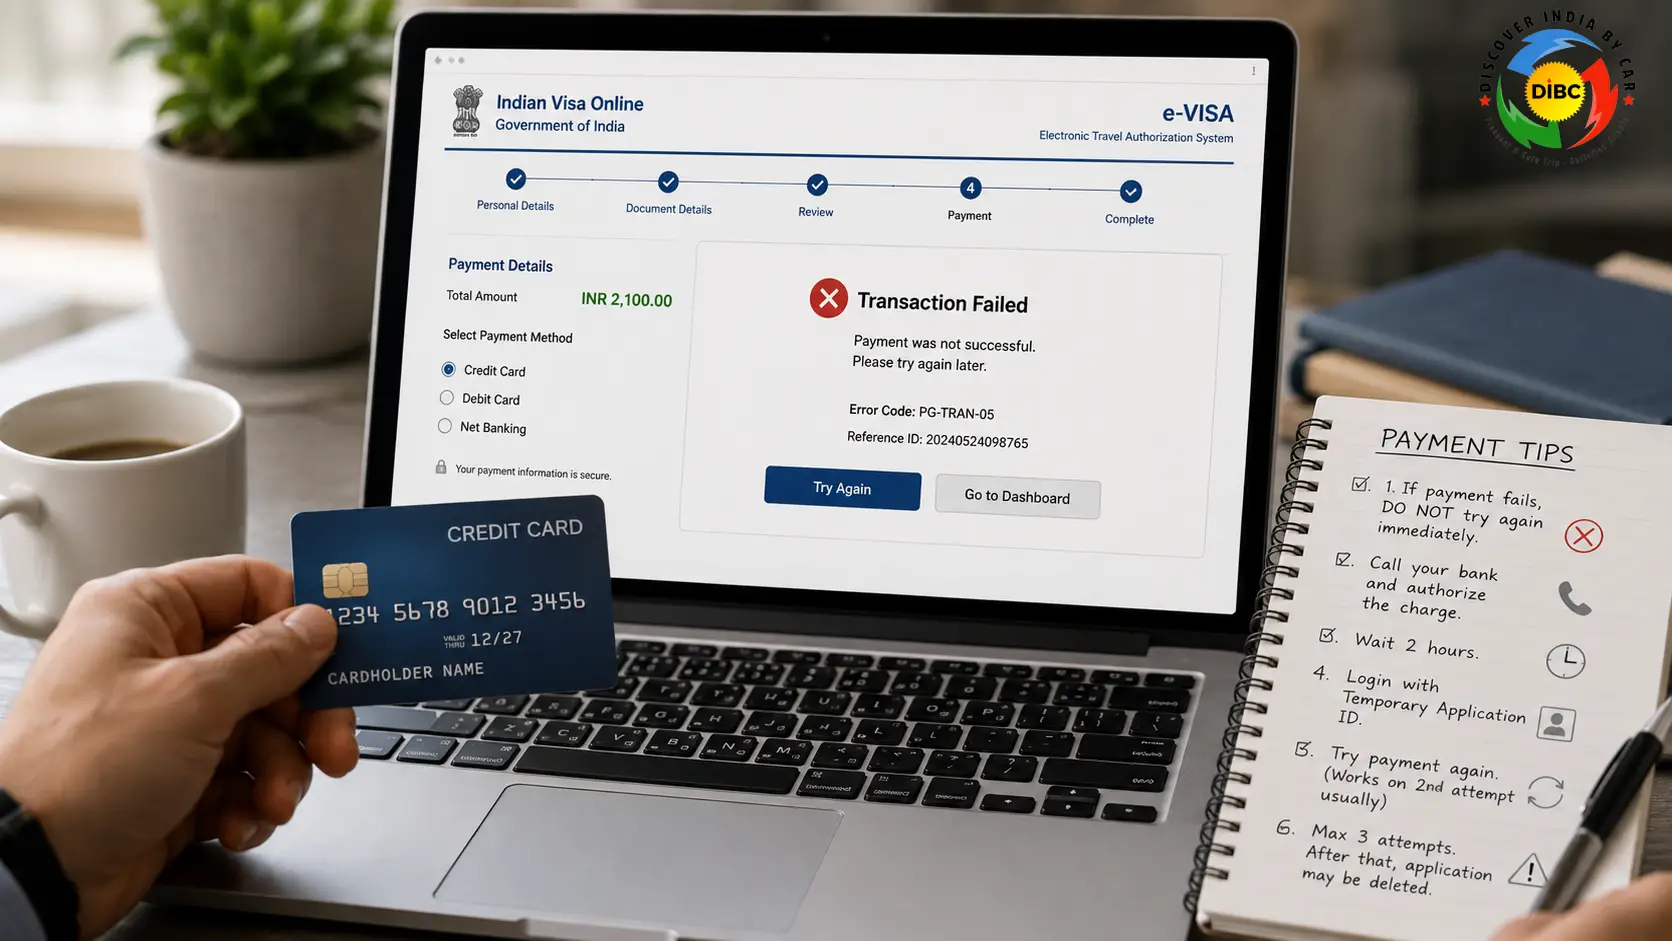
The Final Boss: The Payment Gateway
You’ve made it to the end. You uploaded the perfectly square photo. You uploaded the tiny, sharp PDF. You hit submit. You are taken to a payment screen, usually managed by the State Bank of India (SBI) or Axis Bank.
You type in your credit card details. You hit pay. A little wheel spins on the screen. And then… ‘Transaction Failed’.
Welcome to the club. This happens to roughly a third of all applicants. Western banks see a random charge from the Indian government and their fraud-prevention algorithms immediately block it. Or, the Indian banking server just glitches out.
Here is the golden rule: If your card is declined, DO NOT immediately pull out a different credit card and try again. The Indian visa portal’s security software is incredibly sensitive to rapid-fire payment attempts. It assumes you are a bot or a fraudster, and it will permanently lock your application.
Instead, walk away from the computer. Call your bank and tell them to authorize the charge. Then, wait two full hours. Let the system cool down. Use your Temporary Application ID to log back in, go straight to the payment tab, and try again. It almost always works on the second attempt. If you fail three times, the system deletes your file and you go back to square one.
The fees fluctuate wildly based on your nationality and the time of year, but generally, a 30-day visa during peak season will cost you roughly a few thousand Indian Rupees (equivalent to a cheap dinner out), while a 5-year visa will cost you significantly more. Just pay whatever the screen tells you. It’s non-negotiable anyway.
Landing in India: The Port of Entry Experience
A few days pass. You check your email. There it is: an email with the subject line ‘Status regarding e-Visa application’. You open it. The status says ‘GRANTED’.
First of all, congratulations. You beat the system. But the process isn’t entirely over.
You absolutely, unequivocally must print that ETA document on physical paper. I cannot emphasize this enough. Do not rely on showing a PDF on your phone. Indian airports are deeply rooted in physical paperwork. If you show up at the terminal without a printed copy, the armed security guards at the door won’t even let you into the building to check your bags.
Fast forward. You land at Indira Gandhi International Airport in Delhi. You are exhausted. The air smells like dust and humidity and spices. You walk into the massive immigration hall.
Do not get into the normal line. Look up at the ceiling. There are specific, dedicated desks marked ‘e-Visa’. Get in that line.
When you step up to the desk, slide your physical passport and your printed ETA paper to the officer. They are not going to interrogate you. They process thousands of tourists a day. They might ask, ‘First time in India?’ or ‘Where are you staying?’ Just answer honestly and quickly.
They will ask you to look into a small webcam. Try to look reasonably awake. Then, they will point to a small green glass scanner on the desk. You will place your four fingers on it, then your thumb, to capture your biometrics. The machine beeps. The officer brings a heavy rubber stamp down on a blank page in your passport. *Thwack.*
They hand the book back to you.
You’re in. You made it.
The Real FAQs (The Stuff They Don’t Tell You Online)
Over the years, I’ve compiled a list of questions that clients ask me when they are quietly panicking. Here are the unfiltered answers.
Q: I made a typo on my passport number and already paid. Can I fix it?
A: No. Once the payment gateway processes your money, the application is locked in stone. The government will not allow edits, and they will absolutely not refund you. You have to swallow your pride, swallow the financial loss, and apply again from scratch. Double-check everything before you hit submit.
Q: Can I extend my e-Visa once I’m already inside India?
A: No. The e-Visa is strictly non-extendable. The Indian government is completely inflexible on this. If you want to stay longer, you have to physically leave the country—most backpackers book a cheap weekend flight to Kathmandu or Colombo—and apply for a brand new e-Visa while sitting in a cafe outside of India.
Q: Do I need to show a return flight ticket when I land?
A: Officially, the rules state you must have an onward or return ticket. In reality? The immigration officer in Delhi probably won’t ask to see it. However, the airline agent checking your bags at your departure airport almost certainly will. They are terrified of getting fined. Always have a cheap onward flight booked, even if it’s just a throwaway ticket to a neighboring country.
Q: Do I need any specific vaccinations to get through immigration?
A: No vaccinations are legally required to cross the border, UNLESS you are arriving directly from a country in Africa or South America where Yellow Fever is endemic. In that specific case, you need the Yellow Fever certificate. Otherwise, you’re fine, though you really should be up to date on Typhoid and Hepatitis A for your own sake.
Q: Can I arrive by cruise ship or cross a land border with this e-Visa?
A: The e-Visa is valid for entry at roughly 30 designated international airports and a handful of major seaports (like Mumbai and Goa). It is absolutely NOT valid if you are trying to walk across a land border from Nepal or Bangladesh. If you want to do a land crossing, you must have a regular paper sticker visa.
Q: What happens if my visa expires while I’m still exploring India?
A: Do not let this happen. Ever. Overstaying a visa in India is not treated like a minor administrative error. It is taken very seriously. You will be stopped at the airport when you try to leave, you will be fined heavily (often thousands of Indian Rupees), you will miss your flight, and you will likely be banned from returning to India for years.
Q: I have dual citizenship with the UK and Pakistan. Can I get an e-Visa?
A: This is a tough one. The Indian government is incredibly strict about this. If you hold dual citizenship with Pakistan, or if your parents or grandparents were born in Pakistan, the automated e-Visa system will likely flag your application and reject it. You will be forced to apply for a regular sticker visa, which involves a much, much deeper background check. Plan for it to take months, not days.
Q: Are UK citizens definitely allowed to use the e-Visa in 2026?
A: Yes. There was a brief period a few years ago during a diplomatic argument where the e-Visa was suspended for British passports, which caused absolute chaos. But it was fully restored. In 2026, it works perfectly for UK citizens, exactly the same as it does for Americans and Australians.
────────────────────────────────────────
You Survived the Bureaucracy. Now the Real Journey Begins.
Getting the paperwork sorted is genuinely the most stressful part of visiting India. Once that ETA is printed and in your hand, you can finally exhale.
But India is intense. It is loud, chaotic, beautiful, and completely unapologetic. Navigating the logistics on your first trip—dodging aggressive taxi touts at the airport, figuring out the train system, dealing with the heat and the traffic—can be overwhelming. You want to spend your time looking at the architecture, not staring at Google Maps in a panic.
That is exactly why I built Discover India By Car. We take the chaos entirely out of the equation. We provide private, highly professional, English-speaking drivers for the Golden Triangle and Rajasthan. We pick you up right from the airport terminal in Delhi—your driver will be standing there with your name on a sign. No haggling. No getting lost in the dark. You get a clean, air-conditioned car, an expert local navigator, and total freedom to explore this magnificent country safely and at your own pace.
If you’ve got your visa sorted, let’s talk about the fun stuff. Let’s plan your route.
Reach out to me directly:
WhatsApp: +91-9818434712 | Email: info@discoverindiabycar.com
Visa Sorted? Experience India Without the Chaos.
You conquered the e-Visa portal. Now, let us handle the rest. Skip the aggressive taxi touts at Delhi airport and step straight into a private, air-conditioned car. Explore the Golden Triangle and Rajasthan safely, at your own pace, with an expert local driver.
VIP Airport Pickup — We meet you right at Delhi arrivals with a name sign. No haggling.
Premium AC Fleet — Escape the heat and traffic in our clean, safe Sedans & SUVs.
Total Freedom — Dictate your own pace across Delhi, Agra, and Rajasthan.